Monday, November 30, 2009

Free Novel Writing Software - Plan Your Book's Scenes with yWriter5

As stated previously, you don't need to buy novel writing software if you are just a beginner and can plan/plot the novel with free software available. But feel free to investigate the other paid versions like Novel Writing Made Easy, Storycraft and NewNovellest.

Now, we have created our characters and feel that we know them. Planning the novel can take the form of a step-sheet or scene by scene creation. I use the step-sheet as chapter summaries to ensure I stay on track while writing the chapter, while the more detailed scene summaries prevents me from getting stuck at any time during the writing process. If you know what you are supposed to write, it is just so much easier to find the words, but everyone must find the method that works best for them.

Each scene must have a purpose, otherwise why write the scene in the first place. Defining the goal of the scene before the time, helps you write scenes that advance the plot in some way, whether it is setting a scene for something else to happen or introducing a character to a reader by their actions or moving the story forward.

Every scene should have conflict to be engaging to the reader. Conflict can be inner conflict of the character, conflict with the environment or with another character.

yWriter5 has a space for defining the goal of each scene. Below the short scene summaries, a tab labeled "Goals" provides you with the space to enter the goals of the scene.


In the same row of tabs as the "Goals" tab, select "Description" and enter a short description of the scene you have planned. Remember to save the description after you are done.


We know what we want to convey with the scene and can now proceed to write short scene descriptions. This sounds like a lot of work while you probably only want to get started and write the book to tell your story to the world. But, be patient. If you want to someday attempt to have the book published, you will need a summary of the book. Writing short scene descriptions from the start, provides your with a basic summary/synopsis on which you can expand after you have finished the book.

Select "Reports" from the top menu, then Synopsis and then full synopsis.


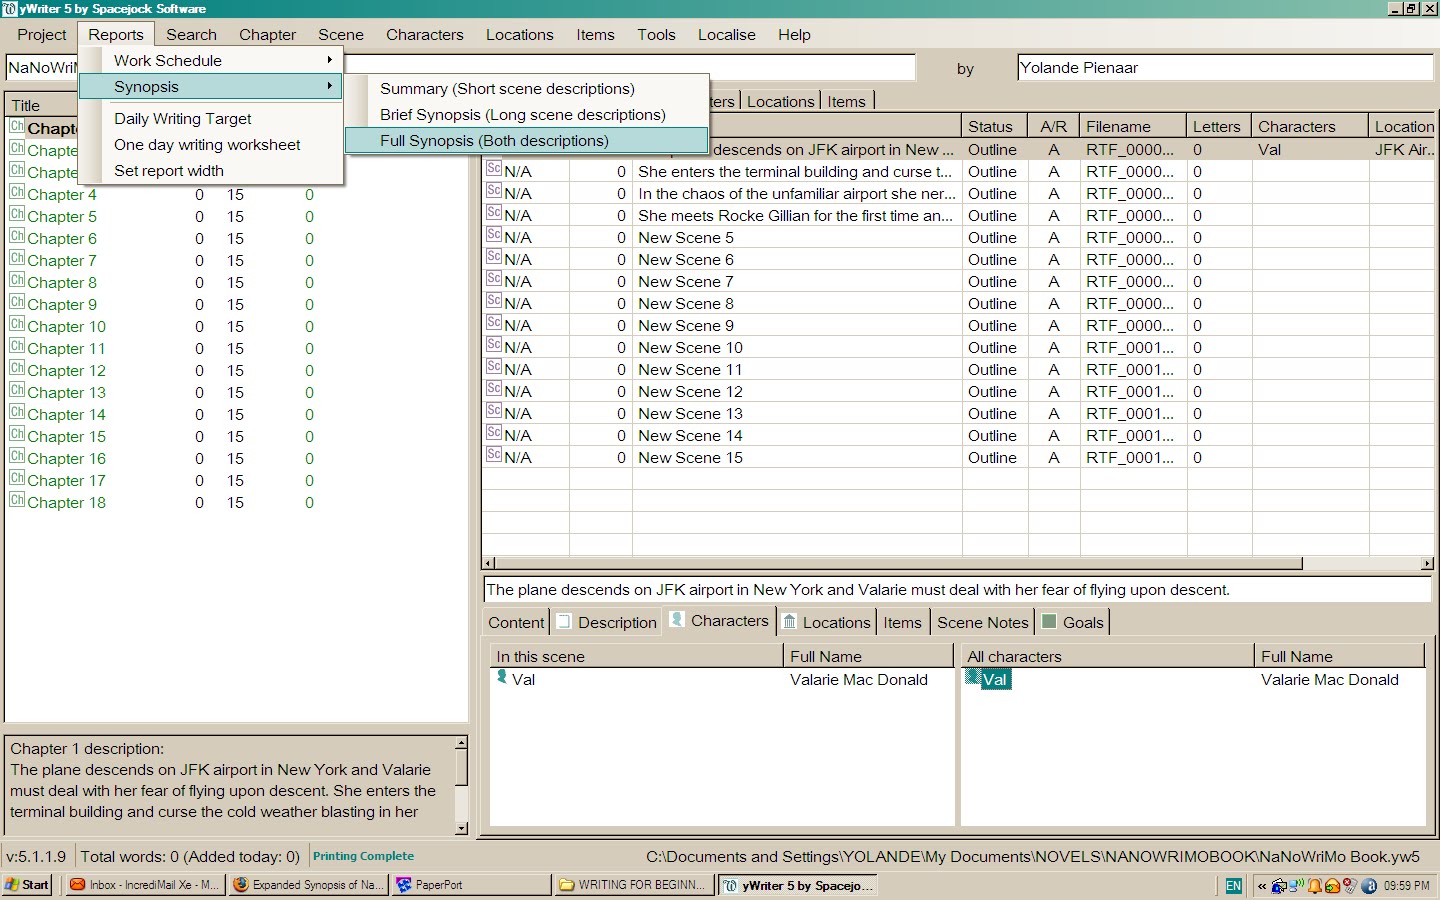
A report will open in a new browser window, providing you with a synopsis of your project to date and a summary of your book and will save you hours of time after you finished writing the novel.


Now we can start writing the novel using the free software provided by Spacejock - yWriter5.

Please tell me if you found this post helpful. 

Tuesday, November 17, 2009

Free Novel Writing Software - Developing Characters Using yWriter5

Using the free novel writing software yWriter as mentioned in the previous post, we must meet our characters. We know what the story would be about and saved it in the project notes and project settings tabs.

The book blurb for my project would read something like this:

Having lost everything in her life that she holds dear, 29-year-old Superintendent Valarie MacDonald grabbed at the chance to track a serial rapist to New York. When the FBI offered their assistance to find the man she had been hunting for three years, Val didn't think twice. That is until she met Special Agent Rocke Gillian. Arrogant and self assured, he challenged her investigative methods and her life philosophy. In the bustling city of New York, she has to battle the cunning of a dangerous murderer, but her worst enemy appeared to be herself and the attraction she felt towards the handsome Rocke.

I know it sounds so clichéd, but we have to start somewhere.

If you read the other posts on this blog, I suggested ways to develop a character so that you feel you intimately know the person. From the short summary above, we know there are at least three characters in the book, namely Valarie MacDonald, Rocke Gillian and the murderer. We now need to create bios for each of them so that at least we know what we are talking about (even though the writing skills may still confuse the reader).

Click on the Character tab in the top toolbar and select "Add New". A character sheet opens with five tabs. Start by typing in the character's name, nickname and then proceed to the description box - still on the same tab.


Here I like to answer questions like:
1.    How old is the character?
2.    What does the character look like (eyes, complexion, hair, height, weight)
3.    How does the character dress?

Moving to the next tab (Bio) I want to know the following:
1.    Where did she grow up?
2.    What kind of childhood did she have?
3.    How does she feel about her parents?
4.    What type of child was she - introvert/extrovert?
5.    What lead to her doing the job she does now?
6.    What was her love life like before the book starts?
7.    Anything that happened in her past that influenced her actions and decisions in the book.

Moving to the "Notes" tab, you can put anything you like in there. Oddities the character does and why, particular pet peeves or likes. Does the name of the character have a meaning? Can you incorporate that into the book?

Under the "Goal" tab, you can insert the way you want your character to grow. In this instance, Val lost her husband and son in a freak motor accident. She is love-shy and afraid to commit her heart to anyone else for fear of experiencing the same pain of loss again. (Yikes, but it does sound like all the other romances out there!)

She needs to grow into unwillingly feeling more for Rocke than she is prepared to admit, concluded that it isn’t so bad to have loved and lost the love. A life without love is not worth living - something like that. I’m sure you get the message.

Under the same tab, I like to have the character tell me more about herself/himself in her/his own voice. This may sound ridiculous, but it establishes a voice for the character in your head. The reader will never see the notes you make here, but these notes will help you keep the narrative true to the character you set in the beginning of the book.

The last tab is the "picture" tab where you can upload a picture of a person resembling the character you try to create. This helps when you need to describe other people's reactions to the character and makes your character seem more real to you.

Follow the same procedure with the locations where the book takes place and here, if you have a picture of the places you describe, it would aid tremendously in writing good prose to take the reader there.

In the next post, we will start planning the novel itself - chapter by chapter and scène by scène.

Monday, November 9, 2009

Plan/Plot Your Novel with yWriter5


So you have downloaded the yWriter5 program as discussed in the previous post, installed it on your computer and now you are ready to start using it. First of all you need to create a new project. Click on the project tab on the left and select New Project Wizard from the drop down menu.


Fill in all the details required by the wizard and return to the main screen. Now you need to add a short summary of your novel (think of the book blurb on the back of a novel) to the project notes so you keep your writing focused and on track. On the main screen at the right hand side you will notice the tab "Project Notes". Click on the tab and select "New".


 Save the note you made there and click on the "Chapter" tab on top and select "Create Multiple Chapters" from the drop-down menu. A screen will pop-up asking how many chapters you want to create. Enter the amount and the chapters will be created in the left side pane of the view.


Next you want to create a number of empty scenes for each chapter. Click on the "Scenes" tab on the top and select "Create multiple scenes". Insert the number of scenes you want to add per chapter and repeat for each chapter. You can always add more scenes or delete scenes later.

Click on the "Project" tab on top and select "Project Settings" from the drop- down menu. In the pop-up box , enter the name of your project in the Project tab and if you wish, enter a short description of the project/book there. Move to the next tab and inset the author name. In the "Deadlines" tab you can enter the dates you want to finish with each part of the novel writing process.


 This is important if you have a deadline to submit the novel to an editor (I wish) or a publisher. Next from the "Tools" tab on top, select "Daily Word Count Target" and fill in the amount of words you want to write, in other words the length of your novel and when you want to start and when you want to complete the first draft. The yWriter program will then calculate how many words you have to write per day to stay on target.


Now that you know how many words you have to write per day, you can start planning your novel. This you can do in various ways. You can first create your characters in the characters tab and add detail to each character or you can start planning the chapters (the story) and add the character detail as you write the draft. Having the details of the characters listed under the character tab helps you later in the novel to avoid inconsistencies in appearance, character traits, etc. The same reasoning applies to the locations tab and the locations where your novel takes place.

Write a short description for each chapter. What is the purpose of the chapter? Think of ten or fifteen questions you want answered in the chapter and formulate that into scene descriptions. In the long descriptions write three or more keywords to remind you what you wanted in the scene.

Once the outline is done, you can begin to actually write the novel by clicking on the scene and entering the text into the text box. This I will deal with in the next post.

All the images above can be expanded to view a larger image in a new tab.

Friday, November 6, 2009

Free Software to Write Your First Novel - Get to Know the Software

The term "free novel writing software" is actually a paradox. No software will write your novel for you and you must still use the good old grey matter.

 Doing a search on the internet for free novel writing software, I could find yWriter5 from Spacejock and Storybook on the first couple of pages of Google. There are a number of other programs available offering free demo's like Novel Writing Made Easy, Storycraft and the ever-popular NewNovellest,www.newnovelist.com but to make use of all the feaures you have to buy the program. Granted, it is not that expensive an exercise to buy these programs and you do get many additional features, but for a novice, first use the free ones.

People have different preferences in their method of writing and you may prefer to simply start with your story idea and let the characters lead you where they will. For some people this works very well, but for others, like me, I need some form of structure to guide me when I stare at the blank page and the character refuses to do his/her own thing. Hence, the search started for software that could make life easier.

Writing programs that offer you the ability to organize your novel in easy to find chapters and scenes and have information about your characters physical and psychological traits on hand while your write, just makes life easier. How many of you had to search for that one scene where you described a location or person. Searching through 40 000 words is time consuming and causes procrastination when you could have spent the time writing the next scene.

Whether you plan the novel completely in advance or simply write by the seat of your pants, copying the scenes into a program that organizes the work, makes editing at a later stage, easier. Trying to edit a scene of 300 words just seems like less work than staring a 3000-word block of text.

If you are a novice like me, you don't want to spend unnecessary money on a sophisticated program when you don't know if you are any good at writing. The two programs mentioned above will surely suffice for a start. Paid programs do offer additional features to assist the author and I would definitely consider looking into them - as soon as I manage to publish my first novel.

Do investigate the free programs mentioned here and tell me what your views of the programs are.
In the next post, I will start showing how I use yWriter to plan/outline a novel.